Globe Artichoke and Mozzarella with Candied Lemon

Globe Artichoke and Mozzarella with Candied Lemon


The UK weather has been so mild of late that is seems almost normal to put together a cold salad for dinner on 27th October 2014!  I was expecting to come home to a cold damp boat every evening and be heating the boat to keep warm but it just hasn’t been necessary.

After spending an eternity in the IKEA returns department and then another eternity spending the store credit we got home quite late and were both feeling pretty hungry. Fortunately this dish can easily be put together in less than 30 minutes.

After bashing together an immediate snack of toasted pumpkin seeds with tamari, I set to work making this awesome salad.

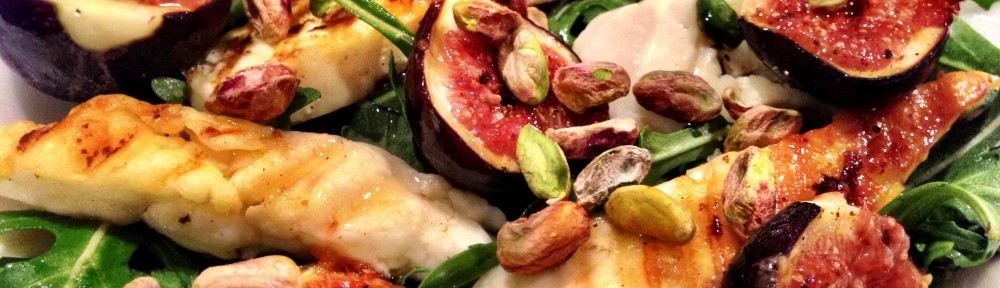
The salad is courtesy of Yotam Ottolenghi’s Plenty More. It does require really fresh ingredients though or it will just disappoint you.

Last week we bought some Dill and Mint from our local Morrisons and it was tasteless, chewy and limp and really let down all the dishes I made. Contrast to yesterday when I asked for mint from our local greengrocer and he went out the back and got me the freshest, most aromatic mint I’ve had for ages. It really is worth shopping around for your herbs!

Anyway – there are two ways of making this dish; the hard way or the easy way. The hard way relies on you being the master of artichoke preparation and having lots of time on your hands. The easy way uses them from a jar or frozen. We don’t have a freezer on the boat so I plumped for jars.

The only cooking involved here is candying some lemons. I really recommend you do this rather than copping out and just adding lemon rind, as the sauce and the sweetness from the lemons really sets this salad apart from the rest.

To candy lemons, remove the rind, cut into 1mm batons and cook down in lemon juice and caster sugar until the liquid reduces to about a third. Remove the lemon batons and allow to cool down. Keep the sauce for the dressing of the salad.

All that’s left is to cut some little gem lettuces, tear in some mint, parsley and basil and top with your quartered artichokes and torn mozzarella.

To serve, dress with some olive oil, your candied lemon and lemon syrup and some black pepper.

This salad is so fresh and tangy. The lemon hit might seem too much to start with but I found it really lifted the salad. The mozzarella, artichokes and lemon went really well together and it really was a meal in itself. Albeit a late one!

Fortunately for us we had loads left over so we have a very nice lunch to look forward to today!

Rice Salad with Nuts and Sour Cherries

Rice Salad with Nuts and Sour Cherries

Wow I haven’t updated this blog for months. Shame on me! But I have been busy honest!

Freya and I got married, and joined a Gym, and started a film club, and basically upped our social life by a factor of a billion.

I just haven’t been cooking properly – at all. Until today!

I resolved on Sunday that we can’t keep eating out, and just eating halloumi wraps every time we come home from the Gym and trawled through my new favourite book – Plenty More by Yotam Ottolenghi.

I shortlisted 12 dishes, ordered all the ingredients from Ocado and threw this together in about 40 minutes.

It’s pretty straightforward, cook some rice, then drain it and let it cool down. While it’s cooling, cooks some pine nuts and almonds in a little oil until they start to brown and let those cool down. Also cook some quinoa and let that cool down. While that’s cooling, fry some onions until they are part crisp and part soft.

Once your onions are done, toss all the above in a big bowl (very big bowl – this made loads) add the onions, sour cherries, rocket, parsley, basil and tarragon, garlic and lemon juice and toss the lot together with some added lemon zest and olive oil.

As you can tell this is a cold-ish salad. It’s best to leave this for a while as you want the lemon juice, garlic and the herbs to work their magic and for the flavours to penetrate into the rice.

I absolutely loved this. It’s the first proper meal I’ve made for a month I think! And there’s loads left for lunch tomorrow!

Celeriac Soup with Goats Cheese Cream and a Walnut and Green Pepper Salsa

Celeriac Soup

Soup? In the summer? Are you mad?

Well no – but whilst looking through the fridge for left over ingredients from last week’s book, I saw that I had some leeks and a whole celeriac.

Denis Cotter has a recipe for Celeriac Soup in his book ‘For the Love of Food’ and it is pretty simple. I had all the ingredients – so why not ! All I lacked was the white wine – which I again ‘borrowed’ from Freya’s mum.

This soup also has a goat’s cheese cream and a green pepper and walnut salsa. Without it I’d have said this would have been bland. But these two additions really make the dish special.

For the soup, you fry some leeks and some garlic until soft, add a whole celeriac (diced) and a potato (also diced), and start the boil with 100ml of white wine.

Once that’s absorbed, add some vegetable stock and cook until the vegetables are tender. Took 30 minutes for me.

Blitz the soup in your favourite blitzer. Season with salt, pepper and nutmeg and serve. Easy!

The best bit though is the toppings:

Soup Toppings

For the cream, mash some goats cheese with some double cream. Simple

For the salsa, chop a green pepper really small, do the same with walnuts, and add in some olive oil and parsley. Just as simple.

We loved this. We ate it whilst watching ‘The Darjeeling Limited’, feeling we had earned a deserved rest after packing up all our stuff for the boat.

We ate the leftovers the next day cold – and to be honest it was just as nice cold. Soup’s don’t have to be hot you know.

Tonight we unofficially move onto the boat. Officially that will be at the weekend!

Spiced Halloumi on a Warm Puy Lentil, Spinach and Beetroot Salad

Image

Catchy title huh!

I love this recipe from Denis Cotter’s ‘For the Love of Food’. I’ve made it before. And it is consistently good – mainly because it is so simple. There’s very little ‘doing’ in this recipe – most of the time is spent roasting the beetroot!

I feel a little bit like Old Mother Hubbard this week. All my cupboards are bare. Everything is packed ready for the move onto the boat – and basic ingredients like flour are nowhere to be seen! Pretty frustrating – but fortunately I had all the ingredients for this dish in the fridge (except 100ml of red wine which I pinched from Freya’s mum!) I say pinched – I did pay for the wine with a serving of the dinner – so it was a fair trade.

The hardest part of this recipe is peeling a beetroot and slicing it into wedges. You just can’t keep your hands clean unless you wear some latex gloves.

Anyway – to make this you peel and wedge a beetroot – toss in some balsamic vinegar and a little olive oil and roast (I did mine in my only remaining oven – the Halogen oven) until they begin to caramelise. It took about 30 mins.

While you’re waiting, cook some lentils in red wine and stock (with some garlic and thyme) until they are cooked and the liquid is absorbed.

While you’re waiting for this, crush some red chilli with some cumin seeds and lime zest/juice; slice some Halloumi, and chop a spring onion or two.

When everything is ready, add the beetroot and the spring onion to the the lentils – and allow to start cooling.

Then fry your Halloumi until it is golden and rub some of your chilli rub into it. Then serve the lentils on a bed of spinach and add the halloumi on top.

This is incredibly easy – and tastes amazing. It’s one of my top five dishes. Consistently good. You can’t get it wrong and it is a very well balanced meal.


Textures of Beetroot

Image

Anyone that follows what I eat knows that I eat a lot of beetroot. I love the stuff. Not that awful prepackaged stuff – or the stuff that comes in a jar pickled in vinegar – but proper raw beetroot.

Roast it yourself (I always do mine in a halogen oven) and all the flavour just comes out – yummy. The books always tell you to wrap them in tin foil but I never do. They seem to come out just as well whether you wrap them up or not.

One big issue with this though is your cooking time – and the time it takes to get the food on the plate is increased by at least an hour. You can’t really roast a raw beetroot in less than an hour – and once you’ve waited for it to cool down so that you can peel the skin off, you are looking at 90 minutes before you’ve even started with the fun stuff.

Thinking a little outside the box I’ve started roasting my beetroots in the morning. Just stick them in the halogen oven for an hour and the oven turns itself off, the beetroots go cold while you’re at work – and presto – you come home and you’ve saved yourself 90 minutes!

Maria Ella presents four beetroot recipes in her book ‘The Modern Vegetarian’. They can all be served together ‘meze’ style and they go together beautifully. The four dishes are:

  • Beetroot Tsatsizi
  • Spiced Caramelised Onion and Bulgar Wheat Pilau
  • Beetroot Keftedes
  • Greek Beetroot Salad

All are pretty simple. All I’ll discuss in separate posts.

The first time I made this I spattered the pages with oil – resulting in a ghastly PDF once I’d despined and scanned the book!

I’ve made this many times since, but computer screens are far more wipe free than the pages of a book – so no further incidents have occurred.

As a complete meal I can thoroughly recommend these four dishes together. It looks beautiful (my photo doesn’t do the meal justice) and there are such variety of textures and flavours. All from one purple root vegetable!

Rosemary and Butternut Squash Polenta Chips

Image

Now here’s a wonderful find. I don’t think I’d have been drawn to these if it weren’t for the really good photo that accompanied the recipe in ‘The Modern Vegetarian’ by Maria Ella. Basically the chips were arranged in a kind of Jenga tower and they looked very impressive. As you can see I didn’t copy that presentation!

I’ve decided that keeping a packet of polenta in the cupboard is a good thing! I’ve only ever made one thing with polenta – Polenta and Sage Pizza – but this is far cooler. I think I could even convince my six year old daughter to eat these – she’d never know they weren’t potatoes.

Making these is pretty easy – but not necessarily quick. There’s not a lot of cooking time – just a lot of waiting time for things to cool.

Firstly you dice some butternut squash very small and boil it with some rosemary. Then you add polenta – and when it thickens you pour it out into a greased tray (or one lined with parchment) and allow it to cool. You really need to season polenta well as it is broadly tasteless. I pressed a load of sea salt and pepper into the top of my slab.

When it is cool enough to put it in the fridge, do so – or do what I did and whack it in the freezer. As you all know by now I eat at stupid o’clock most evenings – we ate these past 10pm again – so the freezer was the quickest way to get this nice and solid.

Once it’s set – turn it out. It’ll look like this:

Image

Cut it into chip sized errr chips, dust them lightly in plain flour and fry them.

I did mine in two different ways – in a halogen oven – and in a frying pan. It’s pretty hard to take a picture of the excitement inside a halogen oven – so here’s a picture of a frying pan!

Image

I have to say the crispier chips came from the halogen oven. And they stayed hotter for a lot longer.

Once they are nice and golden and done, take them out and roll them in some very finely grated parmesan cheese. If you have one of those fancy microplanes like I do this really does the trick beautifully.

I served Freya’s chips with mayonnaise and my own with ketchup. I think mayonnaise was the better option!

The book suggests swapping out the butternut squash for either peas or sweetcorn. Both of which I plan to try. I have to say I couldn’t taste the butternut squash, nor the rosemary. I think it would be better not to add the rosemary to the butternut squash when you are boiling it – I just think it ruins the herbs. It might be better to add it in when you are stirring the polenta – just to keep it fresher!

I really liked these – I could eat a bowl of these anytime – even if they are really just a side. The slab was big – so we had these again the next day as a ‘starter’ while I cooked up our next dinner!

Fresh Borlotti Bean Cassoulet

Image

Does anyone know where to get Fresh Borlotti Beans? I don’t so I couldn’t really make this as per the recipe. If I’m honest I only chose this recipe because I found a couple of tins of them whilst packing up our food as part of our house move and figured I could swap them out without much fuss.

This dish is also from Maria Ella’s ‘The Modern Vegetarian’ – and was pretty easy – and is really just one of those ‘throw it all in a pan’ affairs. The end result is ‘posh beans on toast’ (if you serve it with toast!).

This was nice and quick and took me less than 30 minutes to make – although the recipe suggests that the longer you leave this to infuse the more tasty it will become! We ate really late last Sunday (when I made this) so the flavours didn’t have a chance to infuse. That said the leftovers were definitely more tasty when we had them at work the following day.

To make this you simply fry celery, onion, carrot and garlic (all diced very small) into some olive oil. Once soft add bay leave, sage and oregano, the beans (I used two 400g tins), chopped fresh plum tomatoes (I had a lot of Heritage ones that were very very ripe so I favoured these) and cook.

Now ordinarily in the recipe you would add water to cover the beans and cook for 50 mins or so. But my beans were already cooked so I didn’t bother with this step. I just added enough water to keep the consistency of my beans similar to that of a tin of baked beans.

When it’s all ready you remove from the heat – add lemon zest and lemon juice and some basil and serve with some toasted bread.

As quick dishes go – this was very quick. But I did cheat. This would take far longer if you used fresh beans.

This is quite a nice go to dish if you’re short of time. And it is far better than a tin of baked beans!


Butternut Squash Barley Risotto

Image

It seems like ages since I posted something. I’ve been cooking – I just haven’t had the time to post the reviews!

Moving house and moving onto a boat all at the same time is a recipe for disaster. Especially challenging when you still have to go to work, and your new mooring is a very long way away from where you live. That said, only two weeks left and all these issues should be over!

Anyway – back to the cooking. This is another recipe from ‘The Modern Vegetarian’ by Maria Ella. I’ve made this before. I think in November last year and my memory of it made me want to make it again.

It’s not quite as spectacularly bright and colourful like the Spinach Pearl Barley Risotto I made some time ago – but it is as tasty.

One thing I noticed this time round is butternut squashes all look the same don’t they! But do they taste the same? To me, this risotto didn’t taste as ‘squashy’ as the one I made before. Maybe squashes aren’t really in season in May/June – and lack the taste of an autumn one.

One thing I’ve taken away from this recipe is ‘why use rice’. I’ve never found rice particularly fulfilling. You eat it – you get full – bloated in fact – you go do something and half an hour later you’re hungry again.  Barley is a super substitute. It has three times the carbs, five times the protein, three times the calories and a whopping ten times the fibre. Basically you’ll get more energy from it – and you it’s better for you !

There are many steps to this recipe – and it seems very long winded – but it isn’t – and it is worth it.

To make this you peel a butternut squash, and put the peelings with some onions (peel and all), garlic, carrot and water in a big pan and boil it up to a stock.

Image

Obviously you could cheat here and just use Bouillon or a vegetable stock – but for the effort, and the fact that you have the waste product anyway it seems silly not to. I think in hindsight here you could pep up your stock (if your squash isn’t that flavoursome) with something like that Knorr vegetable stock concentrate.

While that’s reducing down from something like 2 litres to 1 litre, you prep your squash. Dice and roast the end with the pulp with lots of olive oil. I did mine in a halogen oven (hence the round ring).

Image

Next, fry off the other end of the squash in a pan. I messed this up last time I made it by not reading the recipe properly – I ended up roasting the whole squash. To be honest I don’t think it makes the blindest bit of difference. You fry the squash with shallots (I used some left over spring onions) and some spices.

Image


Once you’ve done that – the prep is done.

From here on it’s all plain stirring. Fry the barley, some onion (I used red onions for added colour and the fried diced butternut squash and add some wine to get it going.

Image

Once the wine is absorbed, gradually add your butternut squash stock – risotto style – ladle at a time until each ladle is absorbed. This took around 30 minutes for me.

Once the barley is to your liking (I like mine to have some bite) add the roasted squash (which you need to puree first) – and then some parmesan cheese (how much is up to you!).

I think this is a yummy, filling, wholesome dish which fills you up and leaves you full. I didn’t go overboard with the cheese – but you could if you wanted to – depends on how you like your risotto. I like mine to be a little sloppy and still have some of the liquid unabsorbed.

As I already said this dish is a little more labour intensive but it is worth it. Give it a go!


Smashed Pea, Dill and Feta Crostini

Image

I love green food. I love peas. Fresh peas. And this dish from Maria Ella’s ‘The Modern Vegetarian’ caught my eye whilst I was shortlisting things to make this week.

If you leave out the bread, this is a raw dish. No cooking. Very very simple. Toasting bread isn’t cooking anyway – unless you are one of those toast burners out there. So this really is a no cook dish.

It was another quite late dinner for us as I foolishly placed an Ocado delivery for 8pm. I chose this recipe because it was the quickest and I was hungry. Very quick to make this one!

You can make this in less than 10 minutes. And here’s how:

  • smash some garlic in a pestle and mortar
  • smash some dill and salt into the garlic
  • smash some fresh peas into mix
  • add olive oil, keep smashing
  • add lemon juice keep smashing
  • add parmesan and smash a bit more
  • add crumbled feta – ease off on the smashing
  • toast some ciabatta – try not to smash it
  • serve with some pea shoots on top – if you can find them

You want a texture a bit like this – rather than a massive mush!

Smashed Peas

One thing you must be careful not to do is watch the last five minutes of Season 4 Episode 8 of Game of Thrones whilst doing all this smashing. It just doesn’t sit well !

This is a great simple easy dish – looks lovely – tastes amazing – and you can adjust the amount of parmesan (or leave it out all together) if it’s too cheesy for you.

This was supposed to be a starter for us – but it was filling enough that we didn’t need to eat anymore.

I’m sure this will be one of those go to dishes when I’m time starved or just want a quick bite.


Shakshuka

Image

Some dishes taste better than they look. This is one of them I think.

This dish is a typical Middle Eastern breakfast dish – but yet again because we were late back from the boat – 10:30pm this time – I ended up throwing this together in about 25 minutes.

It rained all day on Sunday so we decided to take a trip to IKEA to pick up two small sofas to go in the wheelhouse of our boat. Sadly – we did the bad thing which was changing our minds on what we wanted – picked something a little bit bigger and found it didn’t fit ! It was a real shame as it meant we just lost a tonne of time driving all the way back to IKEA to return the oversized items and then had to queue for a refund and buy what we had originally planned to buy. By the time we’d done these two trips (from Maidenhead to Wembley) and assembled, dismantled, reboxed, returned, then assembled the smaller sofas it was very late indeed.

We were happy with what we should have bought in the first place though so it really doesn’t matter. Just lost lots of time!

Anyway, this dish is basically poached eggs in a tomato and red pepper sauce. Very simple and very tasty.

After dicing a couple of red peppers and chopping a good half kilo of ripe tomatoes, you fry them off with some Harissa (again!) garlic, cumin and tomato puree until you get a nice thick sauce.

At this stage you make some wells in your sauce and crack eggs into them – then cook until they are done. While they are cooking you wiggle the whites into the sauce a bit – and that’s it!

You serve this dish with Labneh or a thick yoghurt. I used creme fraiche – given I hadn’t made any Labneh (it does take at least a day to make it) and wanted to keep our yoghurt for something else.

Basic, fast, and very tasty. A definite dish to have in the bag when you have no time on your hands.

We definitely have to get out of the habit of eating so late. It’s not good for us! But better than eating nothing and going to bed on a rumbly tumbly.