Pea, Peach and Goats Cheese Salad

Peach, Courgette and Goats Cheese Salad

After remembering to take my cookbook home with me yesterday, I chose to make this very simple but incredibly tasty salad from Hemsley & Hemsley’s cookbook ‘The Art of Eating Well’. Not sure why the courgettes don’t get a mention in the recipe title – there are more of them than any other ingredient.

We took our daily walk to the supermarket, bought all the ingredients (of which there are very few) and I knocked this up in maybe 15 minutes.

Good quality ingredients are essential in dishes like this and – although the peaches weren’t as amazing as the ones we bought at Borough Market at the weekend – a slightly more juicy and sweet peach would have really lifted this dish. I guess the trick would be to go to a greengrocer and try them until you find the ones you want. I doubt the grocer would approve however!

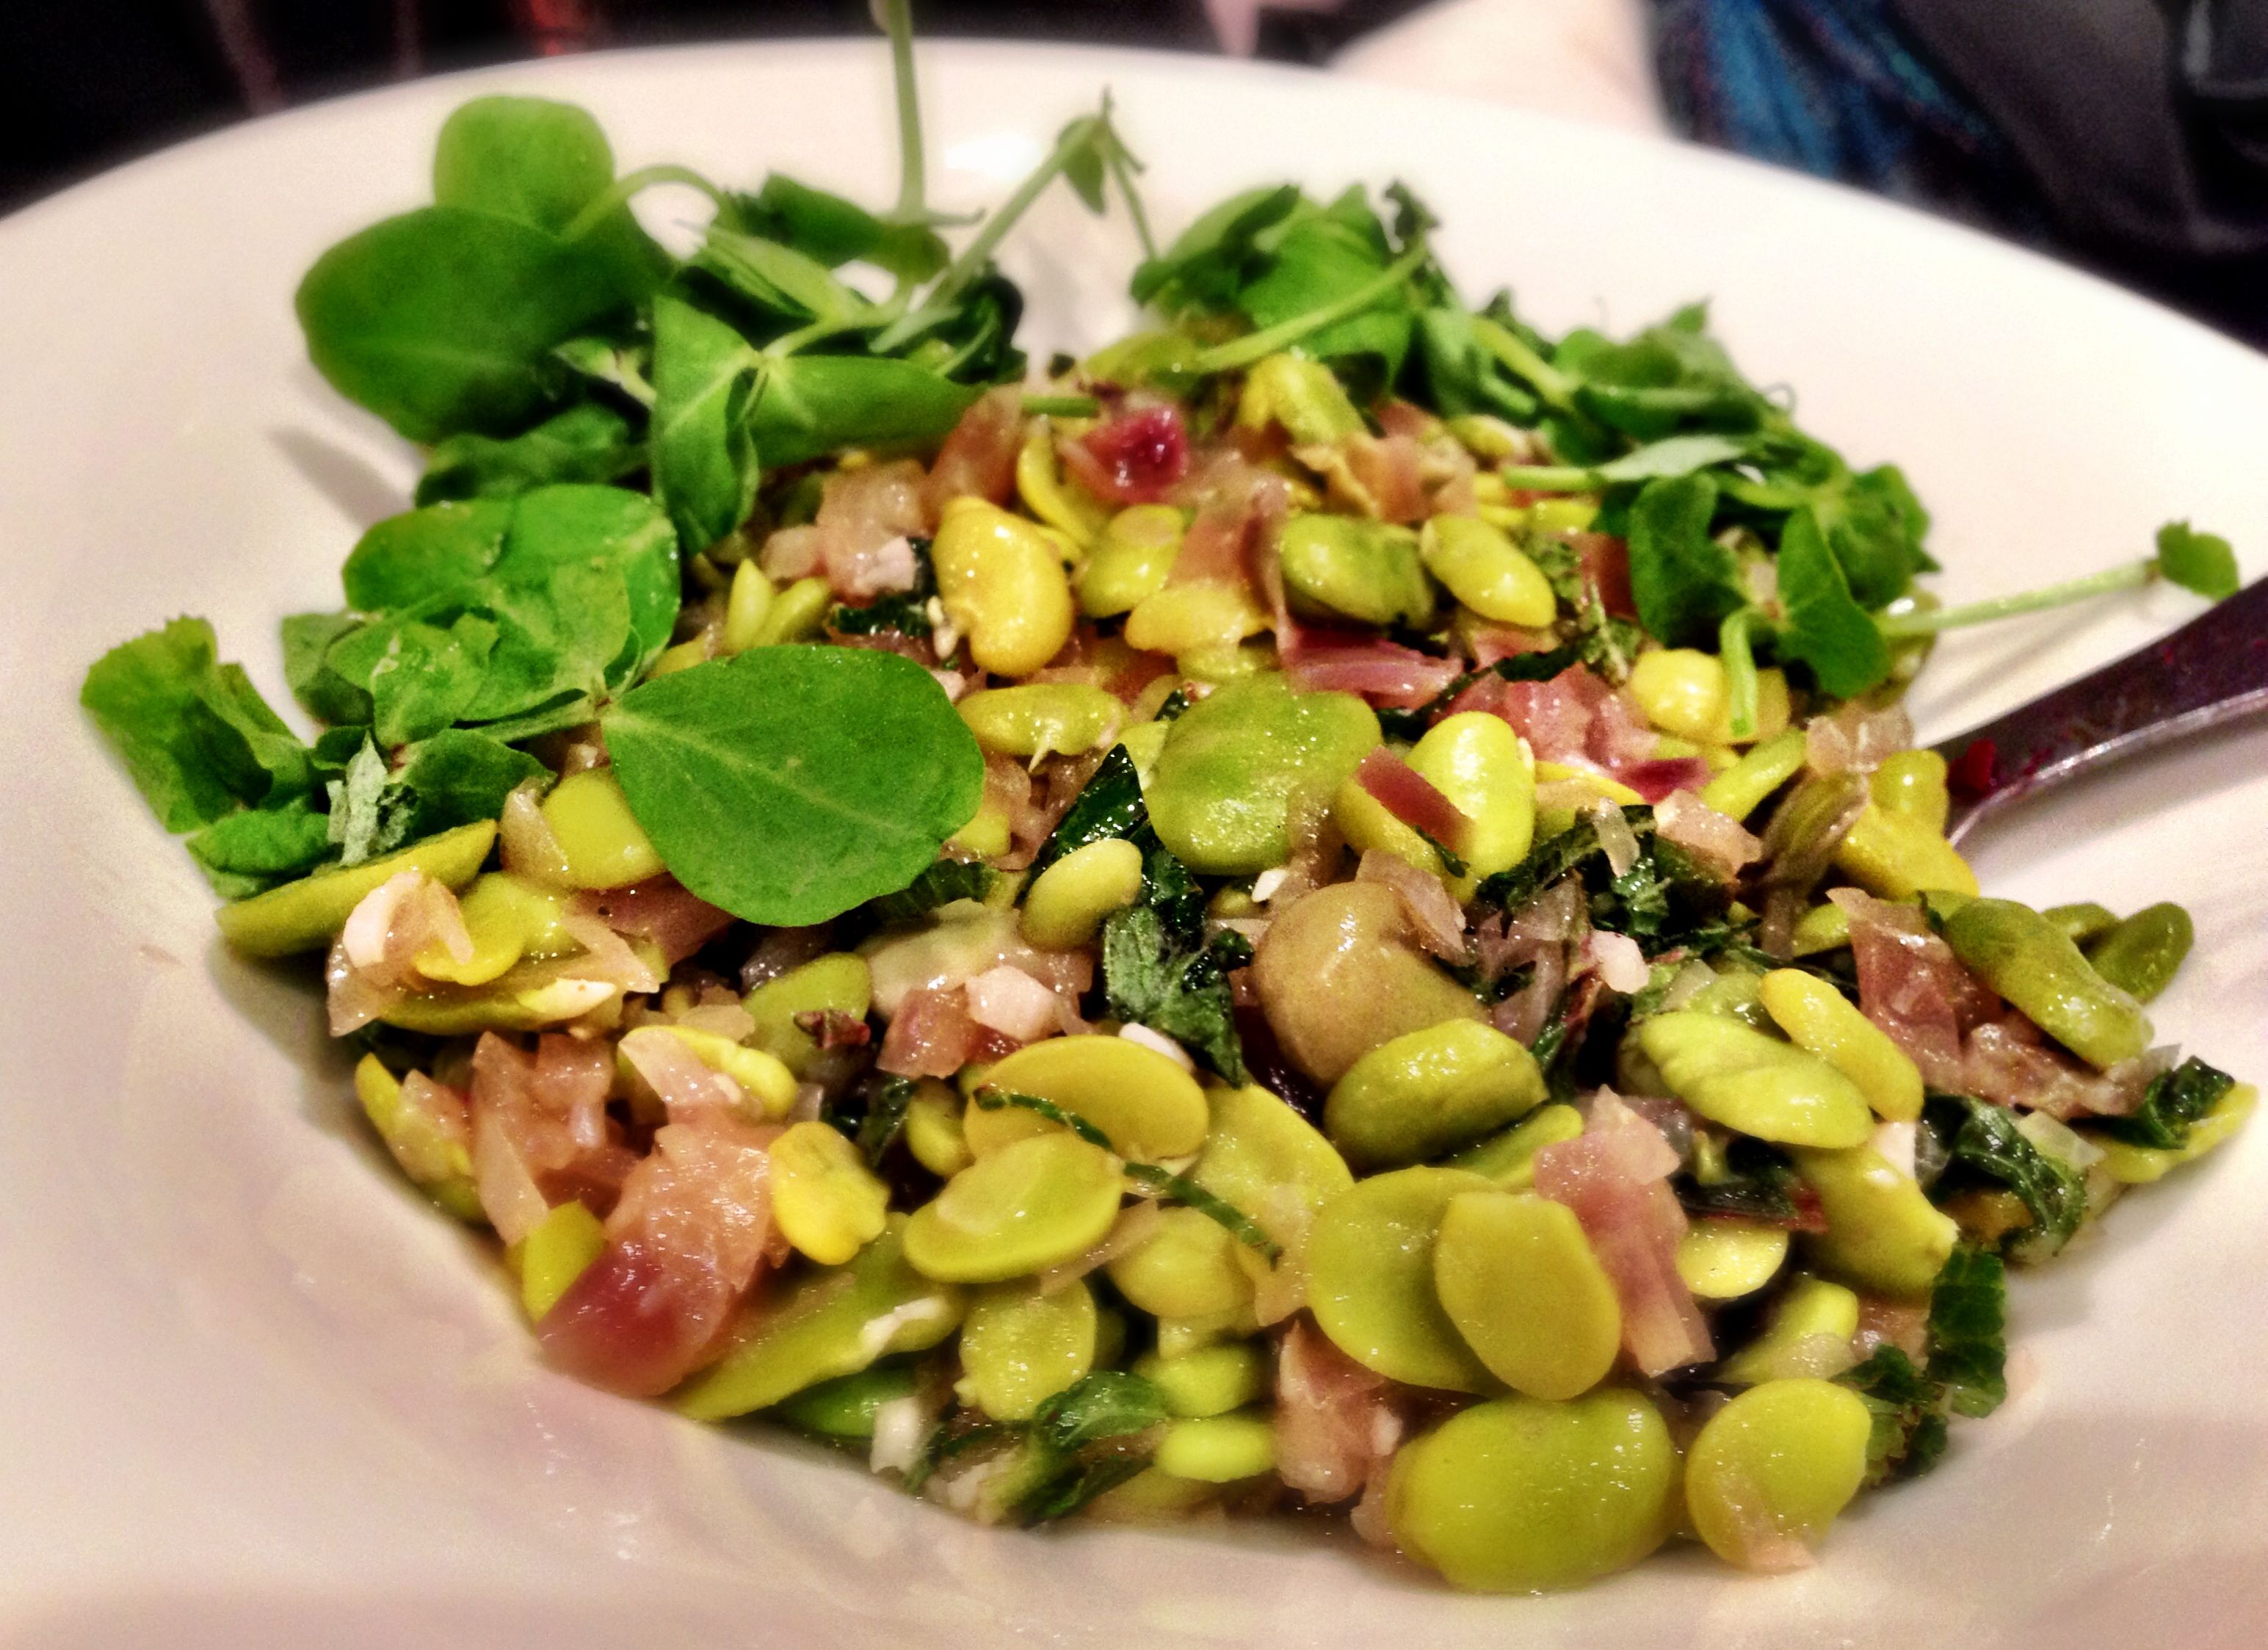
The only cooking in this is to lightly caramelise some courgettes with a little ghee. The rest is all raw and simple construction.

While your courgettes are caramelising tear some lettuce into a bowl, add podded peas, cut peaches, sliced red onion and some soft goats cheese. Add the courgettes when they are done. Finally dress with some olive oil and balsamic – and season.

Very simple dish. And very adaptable. You could add shaved parmesan instead of goats cheese, add different fruits – the skies the limit.

Peach, Courgette and Goats Cheese Salad

I must admit I didn’t think I’d be fulfilled when it was ready. But two bowls of salad later and I was certainly satisfied. Another very quick and easy dish that you can add to your repertoire.

Chickpea and Sweet Potato Stew

Image

20140804-212430-77070407.jpg

First rule of cooking things from a recipe book is to remember not to leave the cookery book on your desk at work! Oh well. Hemsley Hemsley will have to wait until tomorrow.

Another impromptu dish then is this Chickpea and Sweet Potato stew which I’ve grabbed from the ladies at Honestly Healthy. This is from their first book and I chose it because I already had all the ingredients in the cupboard (apart from the aubergine which I popped out and bought).

This is a pretty basic stew. And it kind of looks after itself once you’ve done all the prep.

Quite simply this is sliced red onion and garlic softened, with some diced sweet potato, quartered vine tomatoes and a little water which you cook for a while until it starts to break down and the sauce starts to thicken. Oh – during this stage you also add some cumin, cayenne, a red chilli and some bay leaves.

You then add a couple of tins of chick peas, some diced aubergine, some more water and let it cook for around 30 minutes.

At the recipe’s suggestion – and because I quite fancied having enough leftovers for tomorrow’s lunch, I cooked some brown rice to accompany the stew.

Once your stew is ready, stir in some chopped coriander and serve with the rice.

We quite liked this although it did feel like it was missing something. That something was something unhealthy (obviously) because when you look at the ingredients this couldn’t be any lower in fat. I tasted like a low fat meal.

Also, don’t eat low fat food when you are watching 22 contestants making desserts on Australian Masterchef. You’re just going to feel like you’re missing out on something!.

Impromptu Coleslaw

Coleslaw

I was clearing out the fridge on Saturday, trying to make room for the produce we’d bought at Borough Market. Freya was a little poorly so I decided to make something with the ingredients lying around in the fridge.

This coleslaw (naked of mayonnaise) was simply:

  • half a shredded red cabbage
  • a couple of grated carrots
  • a handful of sliced radishes
  • a sliced large red onion
  • a julienned apple
  • a diced half a cucumber
  • two finely sliced green chillis

I dressed it with some rapeseed oil mixed with honey and white wine vinegar.

It was pretty nice for something made up on the spot. In the end we had it in a wrap with some grilled paneer as a late evening snack whilst we started the mammoth task of watching 60+ episodes of Australian Masterchef Season 5 (you should watch this – it’s very inspiring).

The rest we had for dinner the next day as an accompaniment to the lovely dinner we shared with Freya’s family. It was still nice and crisp and tasted just as good the next day.

Papaya, Halloumi and Watercress Salad

Papaya, Halloumi and Watercress Salad

One of the many lifestyle changes we’ve adopted since moving to the boat is not doing our online shopping with Ocado. Now there’s nothing wrong with online shopping at all – in fact I am a very strong advocate of shopping with Ocado – you can’t beat the quality or the service they offer. That said – boats are smaller than houses and you don’t tend to see many boats with fridge freezers, or a larder. Baisically there’s nowhere to put a week’s worth of shopping!.

Our new approach is to decide daily what we are going to eat, and then go to the local shops and buy our ingredients. We have a fridge – and we can store maybe 2 days worth of fresh ingredients – but there’s no freezer. And it’s been very hot so you can’t just leave stuff out to rot.

In Brentford (where our boat is) there are many local shops – we like Al Shaam – they are a Cypriot shop (I think) and have so many different types of Halloumi, Goats Cheese, fresh Papaya, fresh everything. We really like the guys that run it and they are super helpful – and always have big bunches of the fresh herbs we want. They don’t have everything – so occasionally we have to venture elsewhere – but not very often.

Anyway enough of my life! – this recipe is incredibly easy. Apart from frying off the halloumi it’s all just preparation. I found it made every such a lot but maybe everything just looks so much bigger on a boat!

The recipe is the first one I’ve taken from The Art of Eating Well by Hemsley Hemsley. I chose it because it was very quick to prepare and I knew the shop up the road had all the ingredients. If this is anything to go by I’ll be making a lot more dishes from this book.

All you do with this is wash some watercress and lay it on a big plate or bowl, top it with halved cherry tomatoes and sliced red onion, sliced avocado and slivers of papaya.
Then you toast some pine nuts (I also added some pumpkin seeds) and then fry the halloumi until it is golden.

Add both the halloumi and the pine nuts to the salad, and dress with a some olive oil, runny hunny and apple cider vinegar.

This is really easy. I think I made it in 20 minutes tops. It’s incredibly tasty and because there is so much you can go back for seconds (and thirds in my case).

One thing this dish does highlight is the need for really good ingredients. If I’m honest my avocados were a little bland and the watercress wasn’t the best I’d seen – that said it was still very good indeed.

Celeriac Soup with Goats Cheese Cream and a Walnut and Green Pepper Salsa

Celeriac Soup

Soup? In the summer? Are you mad?

Well no – but whilst looking through the fridge for left over ingredients from last week’s book, I saw that I had some leeks and a whole celeriac.

Denis Cotter has a recipe for Celeriac Soup in his book ‘For the Love of Food’ and it is pretty simple. I had all the ingredients – so why not ! All I lacked was the white wine – which I again ‘borrowed’ from Freya’s mum.

This soup also has a goat’s cheese cream and a green pepper and walnut salsa. Without it I’d have said this would have been bland. But these two additions really make the dish special.

For the soup, you fry some leeks and some garlic until soft, add a whole celeriac (diced) and a potato (also diced), and start the boil with 100ml of white wine.

Once that’s absorbed, add some vegetable stock and cook until the vegetables are tender. Took 30 minutes for me.

Blitz the soup in your favourite blitzer. Season with salt, pepper and nutmeg and serve. Easy!

The best bit though is the toppings:

Soup Toppings

For the cream, mash some goats cheese with some double cream. Simple

For the salsa, chop a green pepper really small, do the same with walnuts, and add in some olive oil and parsley. Just as simple.

We loved this. We ate it whilst watching ‘The Darjeeling Limited’, feeling we had earned a deserved rest after packing up all our stuff for the boat.

We ate the leftovers the next day cold – and to be honest it was just as nice cold. Soup’s don’t have to be hot you know.

Tonight we unofficially move onto the boat. Officially that will be at the weekend!

Spiced Halloumi on a Warm Puy Lentil, Spinach and Beetroot Salad

Image

Catchy title huh!

I love this recipe from Denis Cotter’s ‘For the Love of Food’. I’ve made it before. And it is consistently good – mainly because it is so simple. There’s very little ‘doing’ in this recipe – most of the time is spent roasting the beetroot!

I feel a little bit like Old Mother Hubbard this week. All my cupboards are bare. Everything is packed ready for the move onto the boat – and basic ingredients like flour are nowhere to be seen! Pretty frustrating – but fortunately I had all the ingredients for this dish in the fridge (except 100ml of red wine which I pinched from Freya’s mum!) I say pinched – I did pay for the wine with a serving of the dinner – so it was a fair trade.

The hardest part of this recipe is peeling a beetroot and slicing it into wedges. You just can’t keep your hands clean unless you wear some latex gloves.

Anyway – to make this you peel and wedge a beetroot – toss in some balsamic vinegar and a little olive oil and roast (I did mine in my only remaining oven – the Halogen oven) until they begin to caramelise. It took about 30 mins.

While you’re waiting, cook some lentils in red wine and stock (with some garlic and thyme) until they are cooked and the liquid is absorbed.

While you’re waiting for this, crush some red chilli with some cumin seeds and lime zest/juice; slice some Halloumi, and chop a spring onion or two.

When everything is ready, add the beetroot and the spring onion to the the lentils – and allow to start cooling.

Then fry your Halloumi until it is golden and rub some of your chilli rub into it. Then serve the lentils on a bed of spinach and add the halloumi on top.

This is incredibly easy – and tastes amazing. It’s one of my top five dishes. Consistently good. You can’t get it wrong and it is a very well balanced meal.


Braised Broad Beans with Lemon and Dill

Image

Some dishes just aren’t work the effort. And in hindsight I was very foolish with this dish.

I’ve been looking forward to cooking with Fresh Broad Beans for months. I was naive to assume that you could buy them podded. I was even more naive to assume that podding was quick. Top of the naivety pile was that podding wasn’t the end of it – you have to peel them as well.

It took Freya and myself almost 2 hours to pod and peel two bags of Broad Beans. 1.5 kilograms of broad beans ended up as less than 350g of podded and peeled broad beans. In that time we watched Kill Bill Volume 2. It took that long.

Suffice to say that by the end of it all there was very little enthusiasm to eat. It was just too late – and I felt I knew each broad bean too personally to then cook and eat them!

Anyway back to the recipe: don’t bother – go hungry and save yourself two hours. You’ll lose weight too and your fingers won’t be sore!

But seriously: once you’ve podded the peas, add them to some softened garlic, red onion, sugar and sea salt. Add some stock and cook for 20 minutes – until all the liquid is absorbed. Stir in some dill and lemon juice and serve.

This recipe looks so quick and simple when you are flicking through a cookbook – but getting stung with pea podding and peeling (how many times have I whinged about this now?) means it’ll take you a good couple of hours (and that’s if you have a willing partner who will suffer with you while you pod).

I’ll try this recipe again with frozen and defrosted broad beans. It will probably be fine. But this isn’t a recipe that sets my world on fire. It just didn’t have the excitement and the flavour I was expecting.

Sorry Maria, this is one recipe from ‘The Modern Vegetarian’ that I just didn’t enjoy making.


Textures of Beetroot

Image

Anyone that follows what I eat knows that I eat a lot of beetroot. I love the stuff. Not that awful prepackaged stuff – or the stuff that comes in a jar pickled in vinegar – but proper raw beetroot.

Roast it yourself (I always do mine in a halogen oven) and all the flavour just comes out – yummy. The books always tell you to wrap them in tin foil but I never do. They seem to come out just as well whether you wrap them up or not.

One big issue with this though is your cooking time – and the time it takes to get the food on the plate is increased by at least an hour. You can’t really roast a raw beetroot in less than an hour – and once you’ve waited for it to cool down so that you can peel the skin off, you are looking at 90 minutes before you’ve even started with the fun stuff.

Thinking a little outside the box I’ve started roasting my beetroots in the morning. Just stick them in the halogen oven for an hour and the oven turns itself off, the beetroots go cold while you’re at work – and presto – you come home and you’ve saved yourself 90 minutes!

Maria Ella presents four beetroot recipes in her book ‘The Modern Vegetarian’. They can all be served together ‘meze’ style and they go together beautifully. The four dishes are:

  • Beetroot Tsatsizi
  • Spiced Caramelised Onion and Bulgar Wheat Pilau
  • Beetroot Keftedes
  • Greek Beetroot Salad

All are pretty simple. All I’ll discuss in separate posts.

The first time I made this I spattered the pages with oil – resulting in a ghastly PDF once I’d despined and scanned the book!

I’ve made this many times since, but computer screens are far more wipe free than the pages of a book – so no further incidents have occurred.

As a complete meal I can thoroughly recommend these four dishes together. It looks beautiful (my photo doesn’t do the meal justice) and there are such variety of textures and flavours. All from one purple root vegetable!

Rosemary and Butternut Squash Polenta Chips

Image

Now here’s a wonderful find. I don’t think I’d have been drawn to these if it weren’t for the really good photo that accompanied the recipe in ‘The Modern Vegetarian’ by Maria Ella. Basically the chips were arranged in a kind of Jenga tower and they looked very impressive. As you can see I didn’t copy that presentation!

I’ve decided that keeping a packet of polenta in the cupboard is a good thing! I’ve only ever made one thing with polenta – Polenta and Sage Pizza – but this is far cooler. I think I could even convince my six year old daughter to eat these – she’d never know they weren’t potatoes.

Making these is pretty easy – but not necessarily quick. There’s not a lot of cooking time – just a lot of waiting time for things to cool.

Firstly you dice some butternut squash very small and boil it with some rosemary. Then you add polenta – and when it thickens you pour it out into a greased tray (or one lined with parchment) and allow it to cool. You really need to season polenta well as it is broadly tasteless. I pressed a load of sea salt and pepper into the top of my slab.

When it is cool enough to put it in the fridge, do so – or do what I did and whack it in the freezer. As you all know by now I eat at stupid o’clock most evenings – we ate these past 10pm again – so the freezer was the quickest way to get this nice and solid.

Once it’s set – turn it out. It’ll look like this:

Image

Cut it into chip sized errr chips, dust them lightly in plain flour and fry them.

I did mine in two different ways – in a halogen oven – and in a frying pan. It’s pretty hard to take a picture of the excitement inside a halogen oven – so here’s a picture of a frying pan!

Image

I have to say the crispier chips came from the halogen oven. And they stayed hotter for a lot longer.

Once they are nice and golden and done, take them out and roll them in some very finely grated parmesan cheese. If you have one of those fancy microplanes like I do this really does the trick beautifully.

I served Freya’s chips with mayonnaise and my own with ketchup. I think mayonnaise was the better option!

The book suggests swapping out the butternut squash for either peas or sweetcorn. Both of which I plan to try. I have to say I couldn’t taste the butternut squash, nor the rosemary. I think it would be better not to add the rosemary to the butternut squash when you are boiling it – I just think it ruins the herbs. It might be better to add it in when you are stirring the polenta – just to keep it fresher!

I really liked these – I could eat a bowl of these anytime – even if they are really just a side. The slab was big – so we had these again the next day as a ‘starter’ while I cooked up our next dinner!

Fresh Borlotti Bean Cassoulet

Image

Does anyone know where to get Fresh Borlotti Beans? I don’t so I couldn’t really make this as per the recipe. If I’m honest I only chose this recipe because I found a couple of tins of them whilst packing up our food as part of our house move and figured I could swap them out without much fuss.

This dish is also from Maria Ella’s ‘The Modern Vegetarian’ – and was pretty easy – and is really just one of those ‘throw it all in a pan’ affairs. The end result is ‘posh beans on toast’ (if you serve it with toast!).

This was nice and quick and took me less than 30 minutes to make – although the recipe suggests that the longer you leave this to infuse the more tasty it will become! We ate really late last Sunday (when I made this) so the flavours didn’t have a chance to infuse. That said the leftovers were definitely more tasty when we had them at work the following day.

To make this you simply fry celery, onion, carrot and garlic (all diced very small) into some olive oil. Once soft add bay leave, sage and oregano, the beans (I used two 400g tins), chopped fresh plum tomatoes (I had a lot of Heritage ones that were very very ripe so I favoured these) and cook.

Now ordinarily in the recipe you would add water to cover the beans and cook for 50 mins or so. But my beans were already cooked so I didn’t bother with this step. I just added enough water to keep the consistency of my beans similar to that of a tin of baked beans.

When it’s all ready you remove from the heat – add lemon zest and lemon juice and some basil and serve with some toasted bread.

As quick dishes go – this was very quick. But I did cheat. This would take far longer if you used fresh beans.

This is quite a nice go to dish if you’re short of time. And it is far better than a tin of baked beans!